 Ubuntu Phone documentation
HTML5 Tutorials - Meanings app
This is a great starting place to learn the basics of writing an HTML5 app.
Here, you:
- Start with a new, default HTML5 app project in the Ubuntu SDK
- Implement a simple Ubuntu HTML5 GUI
- Add some Javascript
- Run and test the app
- Take a quick run through packaging the app as a click package
These are the steps you follow for most apps.
You will put together a simple app called “Meanings”. The app displays a simple Ubuntu HTML5 GUI with a header, a text input box, and a button. When the user enters a word in the box and clicks the button, a web API is called that returns the meanings of the word. They are displayed in an Ubuntu List.
This simple app does not use any Ubuntu Platform APIs. Nor does it use a Cordova API. It is a straightforward Ubuntu App that happens to be written in HTML5. Be sure to check out other tutorials that dive into these important areas too.
Before getting started
There are a couple requirements:
- You need to install the Ubuntu SDK
- You need to know how to create an HTML5 app project in the SDK
- You should have some experience running apps from the SDK
Getting the app source
The completed app source tree is available as a Bazaar branch. You can get it as follows:
- Open a terminal with
Ctrl + Alt + T. - Ensure the bzr package is installed with:
$ sudo apt install bzr - Get the branch with:
$ bzr branch lp:ubuntu-sdk-tutorials - Move into the html5/html5-tutorial-meanings directory:
$ cd ubuntu-sdk-tutorials/html5/html5-tutorial-meanings
Now, let’s get developing!
Create your HTML5 app project in the SDK
Go ahead and create an HTML5 app project in the SDK.
Give the project any name you want. Here, we call it “meanings” Later we give the app the proper title displayed to users at runtime: “Meanings”.
Practise running the app
After creating an HTML5 app project in the SDK, you can run it directly from the SDK on the Ubuntu Desktop (and on an attached devices, including physical devices and Ubuntu emulators you have created with the SDK).
Get it running on the Desktop with: Build > Run.
Tip: The SDK has an icon for this (on the left side vertical panel) and a keyboard shortcut: Ctrl + R.
Here’s how a brand new app looks when run from the SDK (the actual GUI may vary as refinements are released):
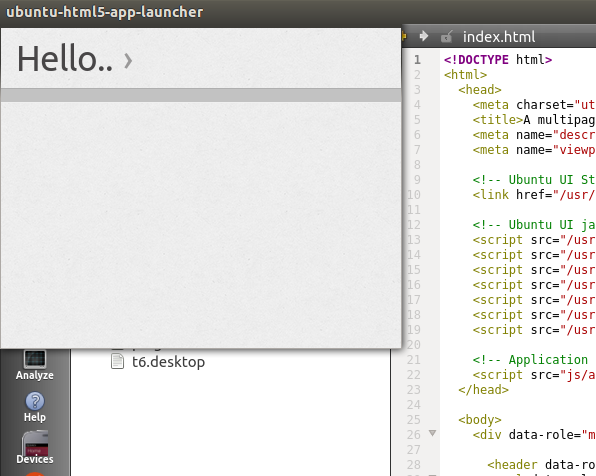
The brand new HTML5 app project has the basic set of files you need. But, naturally, the GUI and control logic are simply the defaults for any new app. We’ll implement a GUI and control logic that suits the needs of or Meanings app below.
Note: If you have a physical device, you can try running it there by following the tips in the Ubuntu SDK section. You can also try creating an emulator and running it there, again following those tips.
Run the app from the terminal
This is a great time to try running the unmodified app directly from the terminal. This can be convenient.
- Open a terminal. There are many ways. A quick way is Ctrl + Alt + T.
- Move to your app project directory.
- Launch the app as follows:
$ ubuntu-html5-app-launcher --www=www
Let’s take a closer look at that command:
ubuntu-html5-app-launcher: This is the executable that launches the web container in which that HTML5 app runs. The container exposes built-in Ubuntu App Platform APIs that your app’s JavaScript can call directly.--www=www: This argument simply tells ubuntu-html5-app-launcher where to find the directory that contains the app’s HTML5 files. Currently, the HTML5 files are required to be in the www/ directory of the app project.
Debugging the app’s JavaScript
Before taking a closer look at Ubuntu HTML5, let’s take a moment to learn how to debug the app’s JavaScript.
Many web developers are familiar with debugging a web page they are developing right in the browser displaying the page using the browser’s own development tools. That’s the approach used with Ubuntu HTML5 apps.
The Ubuntu HTML5 app runtime container is based on WebKit. So is Chrome/Chromium. The approach used here is to send the debug data behind the scenes to a URL. You then open that URL in a WebKit browser, and you can then use its debug capabilities, for example having direct access the the JavaScript console.
Add the --inspector argument to launch in debug mode
When you launch the app from the terminal with ubuntu-html5-app-launcher, you simply add the --inspector argument. Then watch the output in the launch terminal for Inspector server… and open the stated URL with the Chrome, Chromium (or other WebKit) browser.
For example, you would use a command like this:
$ ubuntu-html5-app-launcher --www=www --inspector
Now, watch the output for something like this:
Inspector server started successfully. Try pointing a WebKit browser to http://192.168.1.105:9221
Then, you would open the URL in a WebKit browser (like Chromium) and use its native development tools. In the case of chromium, the displayed web page has a link you click, which takes you to the debug tools for the running app instance.
Tip: An app with a JavaScript error may fail to load the HTML GUI, so getting used to launching in inspector (debug) mode and opening the URL in a WebKit browser is an essential skill.
Let’s move on and take a look at the key files in your new app project.
HTML5 app project files
index.html
Naturally, your new HTML5 app project has an index.html, the root file for the app.
Tip: Currently, all HTML5 files, including index.html, are expected to be in the www/ directory. The index.html file imports all it needs, including Ubuntu CSS and Ubuntu JavaScript, which provides a convenient set of methods to control you Ubuntu HTML5 widgets. By default, it also imports ./js/app.js, the app-specific JavaScript file. And, it may also import a Cordova JavaScript file (not needed for this app, so you can delete it if you want).
Let’s zero in on ./js/app.js.
App specific JavaScript: app.js
This is your app’s essential JavaScript file. You add your control code here.
But first, let’s take a quick look at some critical code it contains by default:
window.onload = function () {
   var UI = new UbuntuUI();
   UI.init();
[...]
}
This is the required code that creates an UbuntuUI object (locally named UI). This object is your entry point into the UbuntuUI API. This API is used to control the Ubuntu HTML5 GUI.
Tip: Later, take a look at the HTML5 UbuntuUI API reference docs.
This is an event handler for the window.onload event. It provides an anonymous
function that executes when the event is received. This event is received
after the DOM fully loads, which is the proper time to initialize the
UbuntuUI.
Note: Another approach is to use the JQuery(document).ready() event handler method, as we do later in this app.
After the UI object is created, the code runs the essential UI.init() method.
This method is needed to initialize the UI framework.
Other project files
Here’s a quick summary of other key files:
- APP.desktop: As noted, this is the file used by the system to launch the app. Check it out and note the critical Exec line that shows the command line the system uses to start the app. Note also useful bits like the Icon line that you use to name the icon file the system uses to represent the app in Unity. This is usually an icon in the app’s source tree.
There are two files that are hidden in the SDK GUI:
- APP.ubuntuhtmlproject: This is the Ubuntu SDK (really, the QtCreator) project file. Select this when browsing the file system from the SDK to open a project.
- APP.ubuntuhtmlproject.user: This contains per project SDK settings. This is normally not edited directly -- use the SDK GUI to set preferences instead. Note, this file is normally not added to version control.
Other key files are added when you package the app, as we see below.
Let’s get on with the HTML5 development!
Ubuntu HTML5 markup intro
Ubuntu HTML5 apps use specific markup to implement the GUI.
Let’s take a super fast look at Ubuntu HTML5 highlights.
Tip: Check out the HTML5 Guide for a more detailed look.
App layout
You can have “flat” organization with tab-style navigation or “deep” organization with pagestack-style navigation. Our app will use the simple tab- style navigation with a single tabitem and a single corresponding tab (for content).
Ubuntu widgets
Ubuntu HTML5 provides a set of widgets you can declare in markup for things like buttons, lists, toolbars (also called footers), dialogs, and etc.
Our app will use:
- A header with a single tabitem with text: “Meanings”
- A corresponding tab that contains the main content, including:
- An input box where the user enters a word
- A button looks up the word in the web API
- A list that displays the returned meanings of the word
Replacing the default HTML5
We don’t need most of the default HTML in index.html. So let’s replace the
whole <body>[...]</body> with HTML5 that declares our app’s GUI.
Copy the following into index.html, replacing the <body>[...]</body>:
  <body>
    <div data-role="mainview">
      <header data-role="header">
        <ul data-role="tabs">
          <li data-role="tabitem" data-page="main-page">Meanings</li>
        </ul>
      </header>
      <div data-role="content">
        <div data-role="tab" id="main-page">
          <div><input type="text" id="word">Enter a word</input></div>
          <button data-role="button" id="lookup">Get</button>
          <div data-role="list" id="res" />
        </div> <!-- tab: main-page -->
      </div> <!-- content -->
    </div> <!-- mainview -->
  </body>
Tip: It may be easier to copy and paste from the app source branch described above.
Let’s check out how the app looks if you run it now with Ctrl + R. Note that the GUI does not function yet because we have not yet added the JavaScript control logic.

App HTML5 highlights
Let’s examine some highlights of this HTML.
Mainview
All the HTML5 inside the body is wrapped in a <div data-role=”mainview”>. This
is standard for Ubuntu HTML5 apps.
Header
- There is a header:
- The header contains an unordered list (ul)
- The unorder list has a single listitem (li) whose data-role is “tabitem”:
- Meanings
This implements the header part of our tab-style layout:
- We have a single tab.
- The text that displays is “Meanings”
- Note the tabitem’s data-page attribute. This value (main-page) is what connects the tabitem to the tab declared lower down whose id is the same:
<div data-role="tab" id="main-page">.
When the user clicks the tabitem in the header, the corresponding tab displays. We have only a single tabitem/tab.
Content
Below the header, we have a content div, declared like this:
<div data-role="content">
[...]
</div> <!-- content -->
This div contains the tabs that correspond with each tabitem declared in the header (in our case, only one tab). Let’s take a look at our tab.
Tab
Here is our one tab:
<div data-role="tab" id="main-page">
[...]
</div> <!-- tab: main-page -->
The data-role="tab" is what declares it as an Ubuntu tab.
As noted above, the id="main-page" is what causes this tab to be displayed
when the user click on the header’s corresponding tabitem.
Let’s peer inside the tab.
Input box
There’s a single input box that the Ubuntu framework styles automatically:
<div><input type="text" id="word">Enter a word</input></div>
We put this in a div so it is rendered as block, not inline, per normal HTML5.
Note the id="word”. We will use this ID from JavaScript to get the word the
user has entered below.
“Get” Button
There is one button that triggers the JavaScript code that calls the web API to look up meanings for the word the user has entered:
<button data-role="button" id="lookup">Get</button>
This button is declared as an Ubuntu button, with a data-role of button. This means it is pulled into the framework and therefore you get a convenient API for it. For example, you can add an click event handler using the id easily.
Tip: Ubuntu CSS provide styles for several button classes. Check out the actual Ubuntu CSS files to see what is available. For example, check out: /usr/share/ubuntu-html5-ui-toolkit/0.1/ambiance/css/buttons.css
Empty List, populated later
We declare a list that starts off empty:
<div data-role="list" id="res" />
That’s an Ubuntu list. We will use the UbuntuUI framework to obtain the list in JavaScript and populate it with the meanings for the word that are returned from the web API lookup.
That’s about it for the HTML5. Pretty straightforward. Now, let’s add the JavaScript we need to complete this app’s basic pieces.
Implementing our Javascript
Adding the JQuery lib
This app uses JQuery to call the web API. We need to add the JQuery lib to our package, which takes a few steps:
-
Ensure libjs-jquery package is installed with: $ sudo apt-get install libjs-jquery
-
Copy the lib into your app directory with $ cp /usr/share/javascript/jquery/jquery.min.js .
-
Tip: You might need to close and open the project for the jquery.min.js file to display in the SDK project.
- Include the jquery.min.js file into your index.html file by adding this line into the main HTML
<header> .. </header>:
Using the JQuery ready event handler
In js/app.js, find the default window.onload event handler:
window.onload = function () {
   var UI = new UbuntuUI();
   UI.init();
[...]
}
Change the first and last lines to use the JQuery ready method, like this:
$( document ).ready(function() {
    var UI = new UbuntuUI();
    UI.init();
[...]
});
Note that the last line has changed!.
Add the button event handler
As noted above, the button event handler code gets the word the user entered and calls the web API to get meanings for it.
Start by deleting all the code inside ready function except for the creation of the UI object and running of its init() method, so it looks like this:
$( document ).ready(function() {
    var UI = new UbuntuUI();
    UI.init();
DELETE ALL THIS CODE
});
Now, after the UI.init(); line, add the following:
    UI.button('lookup').click(function () {
      var lookup = document.getElementById('word').value;
      console.log('Looking up: ' + lookup);
      var url = "http://glosbe.com/gapi/translate?from=eng&dest=eng&format=json&phrase=" + lookup + "&pretty=true";
      $.ajax({
        type: 'GET',
        url: url,
        success: success,
        dataType:'jsonp',
        contentType: "application/json"
      });
    });
Examining the button’s event handling code
First, we see the button being found with its id ("lookup") and its click event handling code being set by this Ubuntu framework code:
UI.button('lookup').click(FUNCTION);
Tip: That’s a common and useful coding pattern in the Ubuntu framework. That is, most UbuntuUI objects that correspond to a specific HTML element with an ID can be obtained in a similar way, for example: UI.dialog(ID).
The value of the user-entered word is obtained.
The URL required by the web API is constructed, inserting the word appropriately.
Then the JQuery ajax() method is called. The key points to note here are that the URL is provided and the function to be called on success is named (it is also named "success").
This success function is defined next, outside of the JQuery ready code.
The success function
Add the following success function at the end of the js/app.js file:
function success( data ){
  console.log('AJAX success.');
  var resEl = document.getElementById('res');
  var res ='<header>Meanings</header><ul>';
  for ( var idx1 = 0; idx1 < data.tuc.length; idx1++ ) {
    if ( data.tuc[idx1].meanings ) {
      console.log('meanings');
      for ( var idx2 = 0; idx2 < data.tuc[idx1].meanings.length; idx2++ ) {
        if ( data.tuc[idx1].meanings[idx2].text ) {
          console.log( data.tuc[idx1].meanings[idx2].text );
          res += '<li>' + data.tuc[idx1].meanings[idx2].text + '</li>';
        }
      }
    }
  }
  resEl.innerHTML = res + '</ul>';
}
This function is called when the web API returns a result. The result is passed into the function with the local name data.
An object named resEl is created for the empty list declared in our HTML and it is given a header: “Meanings”.
Two nested loops iterate through the data to find and extract the contained meanings of the word. These are appended to a string variable (res) as HTML listitems.
Finally the list (resEl) is populated with the built up meanings list by setting its inner HTML to res.
That’s it for app development!
With development done, time to run the app
You can now run the app using the methods referred to previously. For example,
you can use the Ctrl + R shortcut to run it in a window on the Desktop.
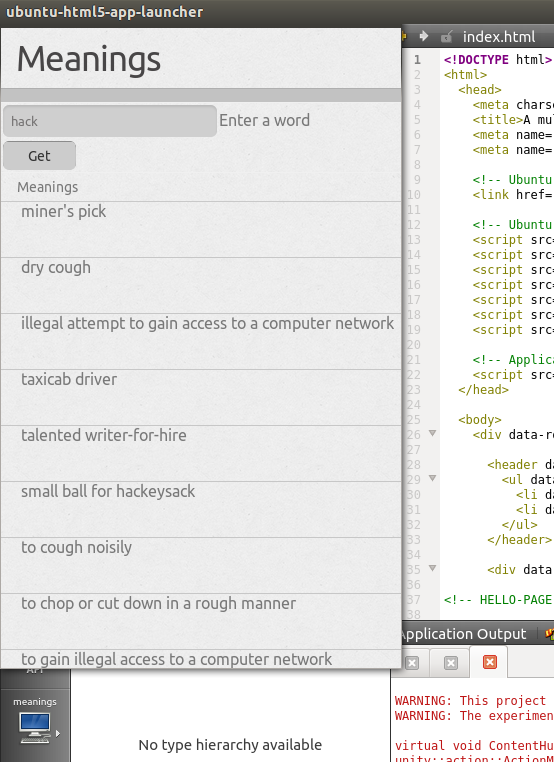
Here we see it running after the user has typed in the word ‘hack’ and clicked the Get button:
If you have problems, you might have accidentally introduced errors, so trying debugging the app’s JavaScript as described above.
Let’s package it!
Give the app a Name and an Icon
Open the app’s desktop file. This file contains key-value pairs that represent the app in the Unity shell and enables displaying and launching the app from the Applications scope and the Unity launcher.
Tip: If you named your app project “meanings”, then the desktop file is named “meanings.desktop.”
Give the app a reasonable name, for example: Meanings
Name=Meanings
You may also want to add an icon to the desktop file. This icon is displayed in the Unity shell to represent the app. Simply add the icon to the app’s source tree (and optionally add it to Bazaar revision control). Then in the desktop file, set the filename:
Icon=meanings.png
Packaging the app as a click package
The Ubuntu SDK makes this really easy.
In the simplest case, all you need to do is navigate to the Publish tab on the left side of the SDK GUI.
Here you see a General tab that displays key info about the package, including:
- Name
- Maintainer: Verify this is you
- title: set this to “Meanings”
- Version: this is the click package version. Be sure to increment this when appropriate, for example when publishing a new version.
- Security policy groups: This is the list of apparmor policies your app needs. (Apparmor is the security/confinement tool used in Ubuntu.)
Tip: Don’t add any security policy groups you don’t really need. Apps are confined by these policies and we all want Ubuntu app confinement to be the best available, which means developers use thoughtful discretion and only add policies as absolutely necessary.
There are other tabs here that we can ignore for now.
Go ahead and click Create Package. This creates the manifest.json file
for the first time. (The manifest.json file may not display in the SDK until
you close and reopen the app project.)
Tip: If you are managing your app project with revision control, for example Bazaar, you should add this file with Tools > Bazaar > Add followed by Tools > Bazaar > Commit.
Manifest.json is the key file when it comes to packaging your app as a click
package. Includes information just gathered It also states the framework the
app requires (this is way to group and version APIs and runtime requirements).
It includes a section called “hooks” that lists the apparmor file that states
the app’s confinement data and that lists the app’s desktop file (used by the
system to launch the app).
Clicking Create Package also creates the actual installable click package file in the app’s parent directory. This file is named based on the fields in the manifest and, by default, is something like this:
com.ubuntu.developer.MAINTER.PACKAGE_VERSION_all.click
Note that package review tools automatically run. You can see their results in the Publish tab in the Validate Click Package section to the right. Check out the report there for errors and fix any you see.
Installing and running the app as a click package
Note:Click packages are currently only officially supported for installation on an Ubuntu for phones/tablets device and in the Ubuntu Emulator.
Now that you have the app packaged, you can use the SDK to install it and run it on an attached device or emulator.
Once you have an attached device or emulator, try it out with: Build > Ubuntu > Install Application on Device
Now, use the device’s GUI to find the app and launch it.
Next Steps
Be sure to check out other HTML5 tutorials and guides in the HTML5 section.