 Ubuntu Phone documentation
Devices - porting to a new device
Ubuntu for devices runs on a variety of mobile devices, such as the Nexus 4 and Nexus 7 2013 (reference hardware) or the bq Aquaris (commercial phone). Due to Ubuntu’s Open Source nature and architecture, it is possible and encouraged to enable other devices to run the mobile OS.
This guide provides all the information required to port Ubuntu to new hardware, and to enable the Ubuntu community to create and host their own ports, with support for Over-The-Air (OTA) updates.
Before getting started
In order to be able to port Ubuntu to a new device, the following prerequisites should be satisfied, nevertheless, you are welcome to follow this guide even if you are attempting your first port with no previous knowledge.
- Android sources: the device already runs Android and we have access to an Android source tree (preferably the original as with OEM devices but CyanogenMod or independent ports are enough too) and kernel sources for the device. Note that this guide focuses on porting to devices present in the AOSP tree and another version will focus on CyanogenMod based ports.
- Drivers: you will need the vendor proprietary drivers, which make the GPU and various sensors work. If not explicitly available for download they need to be extracted from a running device.
- CyanogenMod porting guide: Porting CyanogenMod to a device should be read and understood before embarking on porting Ubuntu Touch, since a lot of the work done requires some knowledge of Android builds and system internals.
- Boot modes: you need to be familiar with how to boot into various modes (bootloader, recovery…) by pressing volume keys or any device specific method.
- Unlock and root: the device needs to be unlocked/rooted in order to allow flashing custom images. A lot of preparation work is common with attempts to port CyanogenMod or other custom Android ROMs.
A few more tips
The XDA developer forums should be searched and consulted for anything non-Ubuntu specific.
Also always refer to sources of a workingimplementation, the official one being the Nexus 4 port.
Terminology
Throughout this guide, some new terms might be introduced. This list should help you getting started understanding what they are:
- AOSP: the Android Open Source Project hosting the original Android source code for a selection of devices.
- CyanogenMod: an open-source OS based on Android.
- Recovery image: an alternative boot mode, independent of your operating system where you can perform advanced recovery and maintenance operations.
- ClockworkMod Recovery: a custom recovery option for Android devices that can be used as a point of entry to replace Android.
- AppArmor: a Mandatory Access Control (MAC) system which is a kernel enhancement to confine programs to a limited set of resources, such as reading from and/or writing to a specific list of folders or files.
- Click package: the packaging format used for apps on Ubuntu, confined by AppArmor.
- Mir: the display server used by Ubuntu, it's a next-generation replacement for X11.
- ADB: a client-server program used in Android application development. It is often used to manage and access shells on Android-based devices.
- Unlock: the action of disabling the software limiting the phone to a single operator's network
- Root: the action of enabling administrative access ("root" access) to the OS.
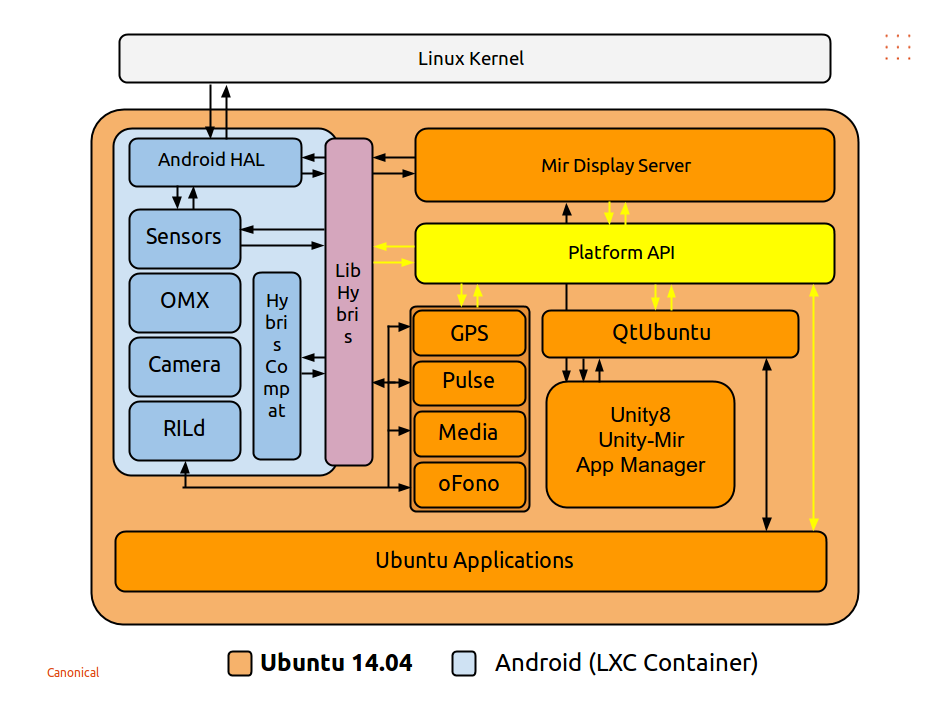
Architectural overview
To rapidly support a wide range of devices, our architecture reuses some of the drivers and hardware enablement available for Android.
As a consequence, at the current images you'll find some of the Android services running at the device, separated in a lxc container, providing all the basic services needed for Ubuntu to run fully accelerated (media, graphics, modem, etc).
For quick reference, these are the current components used from Android:
- Linux Kernel (stock Android kernel provided by the vendor, with a few changes to support some extra features needed by Ubuntu, such as Apparmor)
- OpenGL ES2.0 HAL and drivers
- Media (stagefright) HAL, to re-use the hardware video decoders
- RILD for modem support
- Android Camera HAL and Camera service
As Ubuntu is running as the main host on top of an Android kernel and the communication between the Android services and HAL happens via Binder, Sockets and libhybris.
Other than the very basic services (needed to re-use the binary blobs already available), the rest is just pure Ubuntu goodness (we don't have dalvik running, for example).
Toolchain and build system
A toolchain is a set of distinct software development tools that are linked (or chained) together by specific stages, and are used to build each part of the stack for a final image running Ubuntu - such as GCC (compiler), binutils (tools) and glibc (runtime library).
Toolchain considerations
It is preferred to build everything using the cross toolchain in Ubuntu. Android source trees ship with their own copy of gcc/g++, but unless there are errors when building with the Ubuntu tools, use the Ubuntutools.
Build system
Make sure you are familiar with the Android build system and can build a booting Android image from sources and vendor blobs. If you are not, look closely at the following “Set up your development environment” section.
Set up your development environment
Whether you want to build Ubuntu for the currently supported Nexus devices or want to port it to a new target, you need to set up your working environment to build Android from source. This setup is more or less the same whether you are building AOSP or a project using a part of its sources.
You can find all the needed Android specific git repositories at code-review.phablet.ubuntu.com. This is a working gerrit server with everything needed to build the Android images used by Ubuntu Touch. The reference tree in there is based on AOSP (4.4.2 specifically), so make sure your device specific repositories are compatible with AOSP at least.
For any Android related project at our git server, you'll find a branch named
phablet-4.4.2_r1. This branch contains a static known git HEAD and the
required changes needed for Ubuntu, including our custom Androidmanifest.
The first step is to add the phablet-tools PPA and install the phablet-tools package. Open a terminal and type:
$ sudo add-apt-repository ppa:phablet-team/tools
$ sudo apt-get update
$ sudo apt-get install phablet-tools
Then, install all the other packages you will need for the build by running this command:
$ sudo apt-get install git gnupg flex bison gperf build-essential \
   zip bzr curl libc6-dev libncurses5-dev:i386 x11proto-core-dev \
   libx11-dev:i386 libreadline6-dev:i386 libgl1-mesa-glx:i386 \
   libgl1-mesa-dev g++-multilib mingw32 tofrodos \
   python-markdown libxml2-utils xsltproc zlib1g-dev:i386 schedtool \
   g++-4.8-multilib
From this point on, most of the work is done by the phablet-dev-bootstrap
command (which is, amongst other things, a wrapper over the Android “repo”
command used to manage an Android source tree).
Create a new “phablet” directory. That will host a local repository containing
most of the Android and Ubuntu pieces. Then run phablet-dev-bootstrap to sync
that repository using a custom manifest.
$ mkdir phablet
$ phablet-dev-bootstrap phablet
This step will take a long time (several hours), as it is downloading around 15GB of Android sources.
Recommended: build your first Ubuntu image for a Nexus 4
This is an optional step, but an important one for newcomers. It will ensure your environment is correctly set up. You are going to build your first Ubuntu image for a Nexus 4 before building your port.
First, let’s speed up the incoming build process by enabling caching. Run this command on a terminal:
$ export USE_CCACHE=1
Then, source your path with a set of android build tools. Run this command now:
$ . build/envsetup.sh
See the list of build targets by running the lunch command
$ lunch
      You're building on Linux
      Lunch menu... pick a combo:
        1. aosp_arm-eng
        2. aosp_x86-eng
        3. aosp_mips-eng
        4. vbox_x86-eng
        5. mini_armv7a_neon-userdebug
        6. mini_x86-userdebug
        7. aosp_grouper-userdebug
        8. aosp_tilapia-userdebug
        9. aosp_deb-userdebug
        10. aosp_flo-userdebug
        11. aosp_hammerhead-userdebug
        12. aosp_mako-userdebug
        13. aosp_manta-userdebug
Choose the device you want to build for (in this case, number 12 : aosp_mako-
userdebug)
As the last step, use the make command to build the final image.
$ make -j4 # Or any other amount of threads
And that’s it! If everything went well, you should now have a set of flashable
images (boot, system, recovery) in the out/target/product/mako folder.
Flashing the image
After the build out/target/product/mako will have the device specific build artifacts such as boot.img, system.img, recovery.img which can be flashed using fastboot to the respective partitions like:
$ fastboot flash boot boot.img
$ fastboot flash recovery recovery.img
As our Ubuntu image is not built by the Android build system, the best approach is to just flash it directly using rootstock, like described bellow (from bootloader):
$ fastboot boot out/target/product/mako/recovery.img
$ bzr branch lp:project-rootstock-ng
$ cd project-rootstock-ng/
$ ./rootstock-touch-install vivid-preinstalled-touch-armhf.tar.gz out/target/product/mako/system.img
You can find the latest Ubuntu rootfs image at http://cdimage.ubuntu.com/ubuntu-touch/daily-preinstalled/current/vivid-preinstalled-touch-armhf.tar.gz.
Enabling a new device
If you're repository is compatible with the AOSP tree, it's just a matter of adding the device specific git repositories and the vendor files (usually blobs that you need to extract from the original android image). Once that is done, you should be able build a small android system image that can be used by Ubuntu Touch in order to make it fully compatible with the device.
Device
Add your device specific git repositories under phablet/device ("phablet" is
the repository you cloned by following the previous build example and/or Touch/Building).
Make sure it's respecting the format used by AOSP (device/<vendor>/<device
name>).
Hardware
Add your hardware specific git repositories under phablet/hardware.
Make sure it's respecting the format used by AOSP
(hardware/<vendor>/<component>). As an example:
$ ls hardware/qcom/audio/
Android.mk  hal  legacy  visualizer  voice_processing
Vendor
Add your vendor specific binary blobs under phablet/vendor.
Make sure it's respecting the format used by AOSP (hardware/<vendor>/<component>).
$ ls vendor/asus/flo/
BoardConfigPartial.mk  BoardConfigVendor.mk  device-partial.mk  device-vendor.mk  proprietary
Retrieving the proprietary blobs from Android
Ubuntu Touch Preview uses some pre-compiled binary drivers from the Android layer for rapid enablement of devices. These are referred to as binary or proprietary blobs, as their source code is not available for the build, and are included in binary form.
Since we use AOSP as a base, for supported devices all you need to do is to download and extract and run as mentioned in the downloads from https://developers.google.com/android/nexus/drivers
Device-specific changes
Adapt the Ubuntu kernel: building for an Android device
Kernel config
You can find your kernel config at
kernel/[manufacturer]/[codename]/arch/arm/configs/
cyanogenmod_[codename]_defconfig
. Please double check that it is indeed the
default config file name indevice/[manufacturer]/[codename]/*.mk (look for
the TARGET_KERNEL_CONFIG variable).
We need to enable Ubuntu-specific kernel config options. These config changes are essential, as without them the Android container won't start. The tool under “kernel” in this git repo can do it automatically.
check-config <defconfig file> -w will overwrite the existing configuration with appropriate values for Ubuntu.
Alternatively, the script itself contains the list of configuration values you need to enable or disable.
For debugging while hardware bringup, you may also want to enable
CONFIG_PANIC_TIMEOUT=5 CONFIG_ANDROID_RAM_CONSOLE=y
The Ubuntu boot image and initramfs may not work at first so these two help
read /proc/last_kmsg in case of a boot loop due to a kernel panic from the
recovery image - which should work already, being more or less standard
Android based.
Kernel patches
AppArmor 3.0 patches are essential for click packages (which contain the Ubuntu apps) to run. In general, many security-related and Ubuntu SAUCE patches are going to be expected by the Ubuntu userland. In any case, the phone will boot even without AppArmor, so these can be added later on as the porting progresses.
These patches should be picked from a known good Ubuntu kernel tree, such as the mako (Nexus 4) branch in the official Ubuntu kernel repo:
http://kernel.ubuntu.com/git?p=ubuntu/ubuntu-utopic.git;a=shortlog;h=refs/heads/mako
udev rules
udev is the permission manager for device nodes and supplies the system with device events.
Make sure device nodes are in place by generating an udev rules file based on Android's ueventd file (and possibly manual additions). Most importantly, pay attention to file permissions.
The GPU and drivers will only work once their device nodes are set up.
You can create the udev rules file by invoking the following command while Ubuntu is booted.
$ adb shell cat /var/lib/lxc/android/rootfs/ueventd*.rc|grep ^/dev|sed -e 's/^\/dev\///'|awk '{printf "ACTION==\"add\", KERNEL==\"%s\", OWNER=\"%s\", GROUP=\"%s\", MODE=\"%s\"\n",$1,$3,$4,$2}' | sed -e 's/\r//'
If you are unsure of the result, have a look at the udev.rules file in
/device/VENDOR/DEVICE/ubuntu to get a grasp of what is expected.
AppArmor
AppArmor is an integral part of Ubuntu Touch and is required to use click packages. You are able to use Ubuntu without enabling AppArmor, but you will not be able to use click packages and the port will not be complete without backporting the AppArmor v3 patchset to older kernels. AppArmor has been backported to the following kernels in the Ubuntu archive already:
If you need it for another Kernel, the AppArmor porting process is explained in depth in the AppArmor Portingguide.
Once the AppArmor patchset is working, you will likely need to add hardware-
specific AppArmor rules for your device. You'll know this is the case if when
running an application it shows an AppArmor denial in /var/log/syslog -tail
-f /var/log/syslog | grep DENIED is very handy when troubleshooting policy).
To make this easier, packages can drop AppArmor snippets into
/usr/share/apparmor/hardware/. An entry for graphics hardware will almost
certainly be required for click packages to work on the device. The policy
consults the following directories:
/usr/share/apparmor/hardware/graphics.d: specific graphics hardware access. Used by AppArmor templates/usr/share/apparmor/hardware/audio.d: specific audio hardware access. Used by the audio policy group (due to the use of pulseaudio, this may not be needed for your device)
Though any package can ship the policy, it makes sense for lxc-android-config to ship it since it also ships the udev rules. For example, if porting the HTC Desire Z (vision), you might ship the following:
$ cat /usr/share/apparmor/hardware/graphics.d/htc-desire-z-vision
  # HTC Desire Z (vision)
  /dev/kgsl-2d0 rw,
  /dev/genlock rw,
  /sys/devices/system/soc/soc0/id r,
Typically you specify the path to the device followed by 'r' for read access
or 'rw' for read and write access. Simple globs and AARE (AppArmor regular
expressions) are also possible. See man apparmor.d for details. When
developing your policy, be sure to run sudo aa-clickhook -f before running
your app to regenerate the policy.
Please see DebuggingApparmor for more information on how to debug AppArmor policy.
Testing AppArmor
You can test that AppArmor is functioning correctly by:
- viewing the output of the
aa-statuscommand - manually installing a click app doesn't show any AppArmor errors (
sudo click install --force-missing-framework --user=$USER ./foo.click) - launching the manually installed click application works
- when running, the click application is confined as seen with aa-status. Eg (be sure there are two entries: the first is that the profile is loaded and the second shows a particular pid is running under this profile), eg:
$ sudo aa-status|grep hello-world
ar.com.beuno.hello-world_hello-world_0.1
ar.com.beuno.hello-world_hello-world_0.1 (24622)
- install/launch
hello-worldfrom the Ubuntu appstore and launch it via 'Installed applications'. It should run and aa-status should show it is confined - launch the twitter webapp via 'Installed applications' (preinstalled on the device, otherwise get from the Ubuntu appstore). It should run and
aa-statusshould show it is confined
While porting, it might be useful to disable AppArmor:
- system-wide: boot with
apparmor=0 - only for click packages: adjust the desktop file for the click package in
~/.local/share/applications/<click>.desktopto not use aa-exec and/or adjust/usr/share/upstart/sessions/application-click.confto not use 'apparmor switch'
IMPORTANT: disabling AppArmor for click packages in this manner means that you are disabling important security protections and allowing untrusted, unreviewed arbitrary code to run on your system. While this may be fine while developing the port, it is not enough to finish the port.
Brightness indicator
Due to the incorrect default permission at the sys brightness file, a change is needed to allow any user to change the display brightness. We need to chmod it to the proper permissions.
You can usually find the permission settings needed at the device init file,
which is usually available under device/[manufacturer]/[codename]/init.[codename].rc.
The changes should look like the following:
      1 device/samsung/p3100$ git diff
      2 diff --git a/init.espresso.rc b/init.espresso.rc
      3 index cae5772..4e7df71 100755
      4 --- a/init.espresso.rc
      5 +++ b/init.espresso.rc
      6 @@ -224,6 +224,7 @@ on post-fs-data
      7
      8 #Change permission for backlight and lcd
      9        chown system system /sys/class/backlight/panel/brightness
     10 +       chmod 0666 /sys/class/backlight/panel/brightness
     11        chown system radio /sys/class/lcd/panel/lcd_type
     12        chown system radio /sys/class/lcd/panel/lcd_power
Build changes
main.mk
The main build file needs to be checked if updates are required to it to
support new drivers or parts of the build not used before, its path is:
build/core/main.mk
The part of interest are the subdirs included in the build and if special treatment for devices need to be made. For example, make sure the new vendor subdirs are added!
Put components together
Try building and booting a recovery image, preferably ClockworkMod as the phablet codebase uses. This way all the changes added by Ubuntu to recovery including branding and image upgrade functionality will work. Use the newly built Ubuntu kernel for the recovery image.
Add Ubuntu specific components to the tree (hybris, platform-api, etc). See them under the ubuntu/ directory in your source.
Building
The image
Like in the previous Nexus 4 example, lunch and make commands will create an “out” directory containing flashable images. You can run the same set of commands as for the Nexus 4 build:
$ . build/envsetup.sh
$ lunch # (Pick your device target)
$ make -j4
Push to your device with rootstock-ng
At the end of the build process a couple of .img files will be generated in
out/target/product/<codename>. You can use rootstock-ng to easily push it to
your device.
Rootstock-ng is a set of scripts to create an Ubuntu rootfs (or ISO) locally on your PC like it is done by the Ubuntu cdimage server. You can have a look at its README for more info on what is happening under the hood.
$ bzr branch lp:project-rootstock-ng [rootsock_trunk_path]
$ ROOTFS="utopic-preinstalled-touch-armhf.tar.gz"
$ wget -c "http://cdimage.ubuntu.com/ubuntu-touch/daily-preinstalled/current/$ROOTFS" -O "$OUT/$ROOTFS"
$ $ROOTSTOCK_DIR/rootstock-touch-install "$OUT/$ROOTFS" "$OUT/system.img"
Clean up
Optionally remove components from the tree not used by Ubuntu (chromium, dalvik) if they take up too much space and you want to share the tree with others. These components should not affect build time and image footprint if the previous step was complete and the build/ directory was patched to only build what is necessary.
Change device specific files, for patches which are unlikely to apply cleanly, this include fstab, various init.rc scripts.
Once the device boots into an adb shell you can try working on getting the rest of the system to work. See the Debugging section below.
The graphics stacks is likely to need debugging as well. If it is a device that has not yet been used with Ubuntu before, even Mir may need patches. Understanding gralloc and the rest of the graphics components of the Android HAL is useful here, and can be one of the most difficult parts of the port. If needed, the Mir Hackingguide will help you getting started with Mir.
Setting up an image server
Now that you have your own Ubuntu port, you probably want to serve over-the- air updates to devices and for that, you need an image server: have a look at this step by step explanation by Stéphane Graber to learn how to create one.
Debugging
Initrd
If you encounter initrd issues while booting, you can add the following line
to your kernel boot arguments
break=top
Alternatively, you can replace "top" by another one of the stages below:
- modules
- premount
- mount
- mountroot
- bottom
This will open an adb shell and pause execution of the initrd, so that you can look around. Unlike the usual behavior of breakpoints on the desktop, you cannot resume execution by exiting the adb shell.
You can also add “debug” to the kernel boot argument. This will cause a log to
be recorded in /run/ with the progress of the initrd booting process.
Working in the environment
Networking
The simplest solution, assuming that you have a UI available is to use the networking indicator on the device.
An alternate means of configuring networking is via the phablet-network tool,
which is part of the phablet-tools package.
With your Ubuntu device connected to your host computer, simply run phablet-
network from your desktop to copy an active Network Manager system settings
file to the device. The script also has some extra options which cause the
tool to install network-related packages such as iw and openssh-server.
If you have difficulty enabling the wifi drivers on your platform, you can still get network on your phone with reverse USB tethering over adb. See AdbNetworking for details.
Copying files to the phone
This is required if you are not working from the Android source tree. As
fastboot and adb should be built as part of the system build for the host
part, they should be in your path and located here:
out/host/linux-x86/bin/
If not installing a personal build and not porting using Trusty (or more
recent), make sure you have the phablet-team PPA added, if not, run add-apt-
repository ppa:phablet-team/tools
Then make sure to install adb and fastboot. You can do so by installing the
following packages:
$ apt-get install android-tools-adb android-tools-fastboot
To get packages to your device, execute the following from your desktop:
$ adb root
$ adb push [filename|directory name] [ubuntu path]
Screen Pixel Ratio
We have 2 important variables that define the pixel ratio behaviour of the
system and the applications, ie. how they visually scale. Look at
/usr/bin/ubuntu-session for GRID_UNIT_PX and QTWEBKIT_DPR.
When adding the correct pixel ratio for a new port, first use the method below
to calculate the desired DPR, and create a device specific config file which
ubuntu-session can load at run time.
The number of pixels per grid unit (GRID_UNIT_PX) is specific to each device.
Its goal is to make the user interface of the system and the applications of
the same perceived size regardless of the device they are displayed on. It is
primarily dependent on the pixel density of the device’s screen and the
distance to the screen the user is at. That second value cannot be
automatically detected and is based on heuristics. We assume that tablets and
laptops are the same distance and that they are held at 1.235 times the
distance phones tend to be held at.
A reference device has been chosen from which we derive the pixels per grid unit for all other devices. The reference device is a laptop with a 120 ppi screen and the pixels per grid unit is set to 8 px/gu.
| Device | Form Factor | Resolution | Density | Pixels / grid unit |
|---|---|---|---|---|
| ‘Normal’ Density Laptops | Desktop | * | 96-150 | 8 px/gu |
| ‘High’ Density Laptops | Desktop | * | 150-250 | 16 px/gu |
| Samsung Galaxy Nexus | Phone | 1280x720 | 316 ppi | 18 px/gu |
| LG Nexus 4 | Phone | 1280x768 | 320 ppi | 18 px/gu |
| Samsung Nexus 10 | Tablet | 2560x1600 | 299 ppi | 20 px/gu |
| Asus Nexus 7 | Tablet | 1280x800 | 216 ppi | 12 px/gu |
| Asus Transformer | Tablet | 1280x800 | 149 ppi | 10 px/gu |
There is no way for the system to dynamically identify the correct pixel ratio for the device, which as a side effect things might be bigger/smaller than expected. For each device you will have to visually verify the quality of the result and adjust the number if necessary. If unsure, send screenshots and screen specifications of the device to the Canonical design team.
To create your device specific configuration, first identify the
ro.product.device android property used by your device (check the
/system/build.prop file from your port or from the original Android image).
Then with the desired DPR, create a file at /etc/ubuntu-touch-session.d adding
your custom GRID_UNIT_PX and QTWEBKIT_DPR variables, also specifying the
default form factor you want, such as:
$ cat /etc/ubuntu-touch-session.d/manta.conf
GRID_UNIT_PX=20
QTWEBKIT_DPR=2.5
FORM_FACTOR="tablet"
Need help? Get in touch
Porting an OS to a new device is a broad subject and this guide doesn't
pretend to be exhaustive on that topic. If you need more help on specific
topics, come meet the Ubuntu teams and other like-minded people on IRC :
#ubuntu-touch on Freenode.
You should also probably join our mailing list by adding yourself to the ubuntu-phone team on Launchpad and enabling the team mailing list in your Launchpad options.
If you want to report a bug or suggest changes to this guide, you can do it here.
Troubleshooting
Cannot start ADB without graphics
The ADB service (adbd) lives in the Ubuntu rootfs instead of in the Android
container. For security reasons, the adbd binary shipped with Ubuntu checks if
the device's screen is unlocked and if there is a password set for the phablet
user. It will only start when both requirements are met.
This can present a challenge for porting: if the UI does not come up for some reason, there is no lock screen to check against, and thus adbd will never start.
As a temporary workaround to enable porters to use ADB until any graphical issues have been fixed, there's an unlocked adb binary that can be used instead of the preinstalled one. To use it:
- Download the unlocked adbd binary
- Copy it into the
/usr/bin/adbddirectory in the Ubuntu rootfs of the device being ported - Run the following command to bring up the adbd service as soon as the system switches to the rootfs
echo "start on startup" >/etc/init/android-tools-adbd.override